Mit NextCloud ist es sehr einfach möglich seine eigene Cloud zu erstellen. Dies hat den Vorteil, dass man genau weiß, was mit seinen Daten passiert und wo diese gespeichert sind. Ich zeige die Installation hier am Beispiel mit nginx, MariaDB und PHP7. In dieser Anleitung gehe ich von einem Server aus, auf dem noch keins dieser Programme installiert ist.
Update
| 16.06.2017 | Link wurde auf Nextcloud 12 aktualisiert |
Sollten bereits Programme installiert sein, können diese Schritte übersprungen werden.
1.Nginx
Nginx lässt sich sehr einfach mit folgenden Befehlen installieren.
apt-get update
apt-get install nginx
Wenn sie eine aktuellere Version von Nginx installieren wollen, als die in den Debian Repositories, dann folgen sie dieser Anleitung.
Ansonsten ist die nginx Installation somit schon beendet.
2.MariaDB
MariaDB lässt sich ebenfalls unter Debian 8 sehr einfach installieren. Dazu einfach folgend Befehle ausführen
apt-get update
apt-get install mariadb-client mariadb-server
Während der Installation werdet ihr nach einem Passwort für den MariaDB Root User gefragt. Dort wählt ihr einfach ein sicheres Passwort.
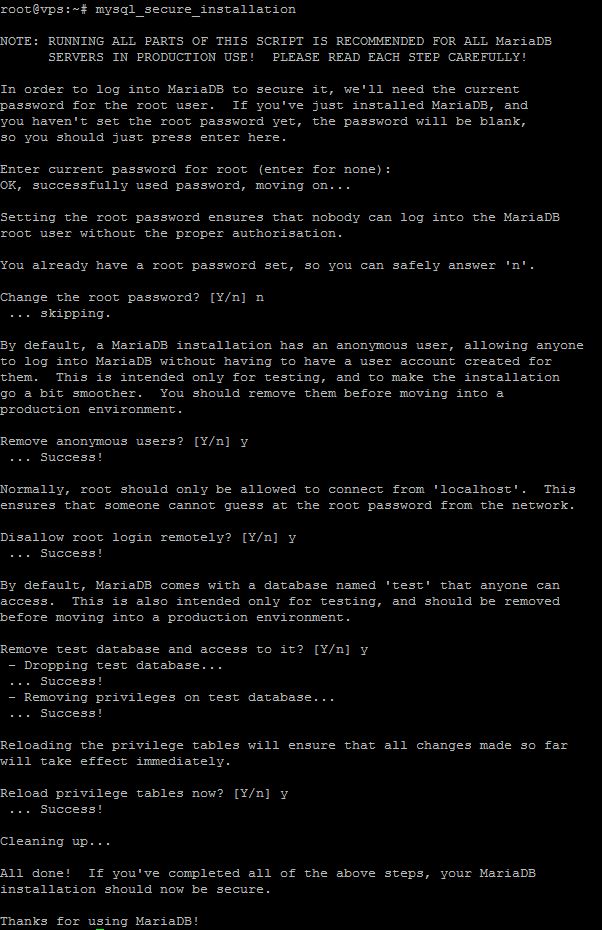
Nach der Installation fügt ihr noch folgenden Befehl aus, um MariaDB abzusichern.
mysql_secure_installation
Nun ist MariaDB vollständig installiert.
3.PHP7
3.1 Überprüfen auf PHP5
Um PHP7 zu installieren müssen sie sicherstellen, dass PHP5 vollständig entfernt ist. Dazu geben sie folgenden Befehl ein:
dpkg --list | grep php | awk '/^ii/{ print $2}'
Wenn wie auf dem Foto noch PHP5 Elemente angezeigt werden, dann müssen diese zuerst deinstalliert werden.
3.2 PHP5 deinstallieren
Dazu führen sie einfach die beiden nachfolgenden Befehle aus. Diese deinstallieren alle auf dem Server vorhandenen PHP5 Elemente.
uninstall="$(dpkg --list | grep php | awk '/^ii/{ print $2}')"
apt-get --purge remove $uninstall
3.3 PHP7 installieren
Um PHP7 zu installieren müssen sie zwei weitere Paketquellen zu Debian hinzufügen.
echo 'deb http://packages.dotdeb.org jessie all' >> /etc/apt/sources.list
echo 'deb-src http://packages.dotdeb.org jessie all' >> /etc/apt/sources.list
Wenn alles geklappt hat, sollte der Befehl folgendes anzeigen:
cat /etc/apt/sources.list
deb http://ftp.debian.org/debian jessie main contrib non-free

deb http://ftp.debian.org/debian jessie-updates main contrib non-free

deb http://security.debian.org jessie/updates main contrib non-free

deb http://packages.dotdeb.org jessie all

deb-src http://packages.dotdeb.org jessie all
Um Pakete aus der neuen Quelle zu installieren muss noch der Schlüssel hinzugefügt werden.
cd /tmp
wget https://www.dotdeb.org/dotdeb.gpg
apt-key add dotdeb.gpg
Nun kann PHP7 mit nachfolgenden Befehlen installiert werden.
apt-get update
apt-get install php7.0-common php7.0-fpm php7.0-cli php7.0-json php7.0-mysql php7.0-curl php7.0-intl php7.0-mcrypt php-pear php7.0-gd php7.0-zip php7.0-xml php7.0-mbstring
4.Nextcloud
4.1 Download der Installations-Datei
Nextcloud kann einfach von der Homepage des Herstellers bezogen werden. Die derzeit aktuelle Version lautet 11.0. Zuerst wechseln wir nun ins Verzeichnis unseres nginx Webservers und installieren danach noch ein Programm (unzip), um die Nextcloud Installationsdatei zu entpacken. Danach wird die Datei entpackt und die Verzeichnisrechte für den Webserver angepasst.
apt-get install unzip
cd /var/www/html/
wget https://download.nextcloud.com/server/releases/nextcloud-12.0.0.zip
unzip nextcloud-12.0.0.zip
chown -R www-data:www-data nextcloud
4.2 SQL Benutzer anlegen
Da NextCloud eine SQL Datenbank (bei uns MariaDB) benötigt, muss hierfür auch ein Benutzer angelegt werden. Dazu loggen sie sich bei MariaDB als Administrator ein mit dem oben im Schritt 2 festgelegten Passwort. Diese Werte werden mittels der nachfolgenden Codezeilen erzeugt. Diese können jedoch einfach verändert werden.
Administrator: nextadmin
Datenbankname: nextcloud
Passwort: geheimesPasswort
mysql -u root -p
create database nextcloud;
create user nextadmin@localhost identified by 'geheimesPasswort';
grant all privileges on nextcloud.* to nextadmin@localhost identified by 'geheimesPasswort';
flush privileges;
exit;
Sie müssen unbedingt “geheimesPasswort” durch ihr eigenes Passwort ersetzen !!!
Im nächsten Schritt müssen noch Änderungen an der MariaDB Konfiguration vorgenommen werden. Diese gibt der Hersteller auf seiner Homepage genau an.
Dazu öffnen sie die Konfigurationsdatei und fügen 3 Zeilen am Ende hinzu.
nano /etc/mysql/my.cnf

Am Ende hinzufügen:

log-bin = /var/log/mysql/mariadb-bin
log-bin-index = /var/log/mysql/mariadb-bin.index
binlog_format = mixed
Danach muss die Datenbank nur noch neugestartet werden.
service mysql reload
4.3 Nginx Konfiguration anpassen
Die Konfigurationsdateien zu nginx können sich auf der Homepage von Nextcloud angeschaut werden. Hier besteht die Möglichkeit Nextcloud direkt im Root Verzeichnis des Webservers oder als Unterverzeichnis zu konfigurieren. Root Verzeichnis bedeutet, dass man über die URL “goneuland.de” direkt auf die NextCloud Oberfläche kommt. Wenn sie “Unterverzeichnis” wählen, dann wird NextCloud per “goneuland.de/nextcloud” aufgerufen. Im Nachfolgenden zeige ich beide Konfigurationen. Da die Daten verschlüsselt übertragen werden sollten, müssen sie noch ein Zerfikat erstellen, wenn sie noch keins haben sollten. In dieser Anleitung wird dies genau erklärt.
4.3.1 Root Verzeichnis
Ihr müsst nun die Konfiguration öffen
nano /etc/nginx/sites-available/default
und mit nachfolgendem Code den Inhalt der Datei überschreiben.
Die markierten Stellen müsst ihr anpassen.
upstream php-handler {
server unix:/run/php/php7.0-fpm.sock;
}

server {
    listen 80;
    server_name cloud.example.com;
    # enforce https
    return 301 https://$server_name$request_uri;
}

server {
    listen 443 ssl;
    server_name cloud.example.com;

    ssl_certificate /etc/ssl/nginx/cloud.example.com.crt;
    ssl_certificate_key /etc/ssl/nginx/cloud.example.com.key;

    # Add headers to serve security related headers
    # Before enabling Strict-Transport-Security headers please read into this
    # topic first.
    # add_header Strict-Transport-Security "max-age=15768000;
    # includeSubDomains; preload;";
    add_header X-Content-Type-Options nosniff;
    add_header X-Frame-Options "SAMEORIGIN";
    add_header X-XSS-Protection "1; mode=block";
    add_header X-Robots-Tag none;
    add_header X-Download-Options noopen;
    add_header X-Permitted-Cross-Domain-Policies none;

    # Path to the root of your installation
    root /var/www/html/nextcloud/;

    location = /robots.txt {
        allow all;
        log_not_found off;
        access_log off;
    }

    # The following 2 rules are only needed for the user_webfinger app.
    # Uncomment it if you're planning to use this app.
    #rewrite ^/.well-known/host-meta /public.php?service=host-meta last;
    #rewrite ^/.well-known/host-meta.json /public.php?service=host-meta-json
    # last;

    location = /.well-known/carddav {
      return 301 $scheme://$host/remote.php/dav;
    }
    location = /.well-known/caldav {
      return 301 $scheme://$host/remote.php/dav;
    }

    # set max upload size
    client_max_body_size 512M;
    fastcgi_buffers 64 4K;

    # Disable gzip to avoid the removal of the ETag header
    gzip off;

    # Uncomment if your server is build with the ngx_pagespeed module
    # This module is currently not supported.
    #pagespeed off;

    error_page 403 /core/templates/403.php;
    error_page 404 /core/templates/404.php;

    location / {
        rewrite ^ /index.php$uri;
    }

    location ~ ^/(?:build|tests|config|lib|3rdparty|templates|data)/ {
        deny all;
    }
    location ~ ^/(?:\.|autotest|occ|issue|indie|db_|console) {
        deny all;
    }

    location ~ ^/(?:index|remote|public|cron|core/ajax/update|status|ocs/v[12]|updater/.+|ocs-provider/.+|core/templates/40[34])\.php(?:$|/) {
        include fastcgi_params;
        fastcgi_split_path_info ^(.+\.php)(/.*)$;
        fastcgi_param SCRIPT_FILENAME $document_root$fastcgi_script_name;
        fastcgi_param PATH_INFO $fastcgi_path_info;
        fastcgi_param HTTPS on;
        #Avoid sending the security headers twice
        fastcgi_param modHeadersAvailable true;
        fastcgi_param front_controller_active true;
        fastcgi_pass php-handler;
        fastcgi_intercept_errors on;
        fastcgi_request_buffering off;
    }

    location ~ ^/(?:updater|ocs-provider)(?:$|/) {
        try_files $uri/ =404;
        index index.php;
    }

    # Adding the cache control header for js and css files
    # Make sure it is BELOW the PHP block
    location ~* \.(?:css|js|woff|svg|gif)$ {
        try_files $uri /index.php$uri$is_args$args;
        add_header Cache-Control "public, max-age=7200";
        # Add headers to serve security related headers (It is intended to
        # have those duplicated to the ones above)
        # Before enabling Strict-Transport-Security headers please read into
        # this topic first.
        # add_header Strict-Transport-Security "max-age=15768000;
        #  includeSubDomains; preload;";
        add_header X-Content-Type-Options nosniff;
        add_header X-Frame-Options "SAMEORIGIN";
        add_header X-XSS-Protection "1; mode=block";
        add_header X-Robots-Tag none;
        add_header X-Download-Options noopen;
        add_header X-Permitted-Cross-Domain-Policies none;
        # Optional: Don't log access to assets
        access_log off;
    }

    location ~* \.(?:png|html|ttf|ico|jpg|jpeg)$ {
        try_files $uri /index.php$uri$is_args$args;
        # Optional: Don't log access to other assets
        access_log off;
    }
}
4.3.2 Unterverzeichnis
Ihr müsst nun die Konfiguration öffen
nano /etc/nginx/sites-available/default
und mit nachfolgendem Code den Inhalt der Datei überschreiben.
Die markierten Stellen müsst ihr anpassen.
upstream php-handler {
server unix:/run/php/php7.0-fpm.sock;
}

server {
    listen 80;
    server_name cloud.example.com;
    # enforce https
    return 301 https://$server_name$request_uri;
}

server {
    listen 443 ssl;
    server_name cloud.example.com;

    ssl_certificate /etc/ssl/nginx/cloud.example.com.crt;
    ssl_certificate_key /etc/ssl/nginx/cloud.example.com.key;

    # Add headers to serve security related headers
    # Before enabling Strict-Transport-Security headers please read into this
    # topic first.
    #add_header Strict-Transport-Security "max-age=15768000;
    # includeSubDomains; preload;";
    add_header X-Content-Type-Options nosniff;
    add_header X-Frame-Options "SAMEORIGIN";
    add_header X-XSS-Protection "1; mode=block";
    add_header X-Robots-Tag none;
    add_header X-Download-Options noopen;
    add_header X-Permitted-Cross-Domain-Policies none;

    # Path to the root of your installation
    root /var/www/html/;

    location = /robots.txt {
        allow all;
        log_not_found off;
        access_log off;
    }

    # The following 2 rules are only needed for the user_webfinger app.
    # Uncomment it if you're planning to use this app.
    # rewrite ^/.well-known/host-meta /nextcloud/public.php?service=host-meta
    # last;
    #rewrite ^/.well-known/host-meta.json
    # /nextcloud/public.php?service=host-meta-json last;

    location = /.well-known/carddav {
      return 301 $scheme://$host/nextcloud/remote.php/dav;
    }
    location = /.well-known/caldav {
      return 301 $scheme://$host/nextcloud/remote.php/dav;
    }

    location /.well-known/acme-challenge { }

    location ^~ /nextcloud {

        # set max upload size
        client_max_body_size 512M;
        fastcgi_buffers 64 4K;

        # Disable gzip to avoid the removal of the ETag header
        gzip off;

        # Uncomment if your server is build with the ngx_pagespeed module
        # This module is currently not supported.
        #pagespeed off;

        error_page 403 /nextcloud/core/templates/403.php;
        error_page 404 /nextcloud/core/templates/404.php;

        location /nextcloud {
            rewrite ^ /nextcloud/index.php$uri;
        }

        location ~ ^/nextcloud/(?:build|tests|config|lib|3rdparty|templates|data)/ {
            deny all;
        }
        location ~ ^/nextcloud/(?:\.|autotest|occ|issue|indie|db_|console) {
            deny all;
        }

        location ~ ^/nextcloud/(?:index|remote|public|cron|core/ajax/update|status|ocs/v[12]|updater/.+|ocs-provider/.+|core/templates/40[34])\.php(?:$|/) {
            include fastcgi_params;
            fastcgi_split_path_info ^(.+\.php)(/.*)$;
            fastcgi_param SCRIPT_FILENAME $document_root$fastcgi_script_name;
            fastcgi_param PATH_INFO $fastcgi_path_info;
            fastcgi_param HTTPS on;
            #Avoid sending the security headers twice
            fastcgi_param modHeadersAvailable true;
            fastcgi_param front_controller_active true;
            fastcgi_pass php-handler;
            fastcgi_intercept_errors on;
            fastcgi_request_buffering off;
        }

        location ~ ^/nextcloud/(?:updater|ocs-provider)(?:$|/) {
            try_files $uri/ =404;
            index index.php;
        }

        # Adding the cache control header for js and css files
        # Make sure it is BELOW the PHP block
        location ~* \.(?:css|js|woff|svg|gif)$ {
            try_files $uri /nextcloud/index.php$uri$is_args$args;
            add_header Cache-Control "public, max-age=7200";
            # Add headers to serve security related headers  (It is intended
            # to have those duplicated to the ones above)
            # Before enabling Strict-Transport-Security headers please read
            # into this topic first.
            # add_header Strict-Transport-Security "max-age=15768000;
            # includeSubDomains; preload;";
            add_header X-Content-Type-Options nosniff;
            add_header X-Frame-Options "SAMEORIGIN";
            add_header X-XSS-Protection "1; mode=block";
            add_header X-Robots-Tag none;
            add_header X-Download-Options noopen;
            add_header X-Permitted-Cross-Domain-Policies none;
            # Optional: Don't log access to assets
            access_log off;
        }

        location ~* \.(?:png|html|ttf|ico|jpg|jpeg)$ {
            try_files $uri /nextcloud/index.php$uri$is_args$args;
            # Optional: Don't log access to other assets
            access_log off;
        }
    }
}
5. NextCloud starten
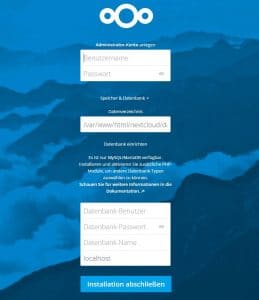
Wenn ihr nun NextCloud startet, dann solltet ihr folgendes sehen. Das Datenverzeichnis sollte aus Sicherheitsgründen nicht innerhalb des Webservers liegen. Also NICHT im Pfad /var/www/….
Hier gebt ihr noch den Benutzer + Passwort an, den ihr im Schritt 4.2 angelegt habt.
Nun seid ihr fertig und habt eure eigene Cloud für eure Daten.


Hi,
danke für den Artikel!
Kurzer Hinweis: Die Konfiguration in 4.3.2 funktioniert nur, wenn wie weiter oben Nginx aus den Backports installiert wird, die aktuell in Debian 8 verwendete Version 1.6 von Nginx kann (vor Version 1.7.11) mit der Direktive “fastcgi_request_buffering” nichts anfangen und verweigert dann den Start.
Gruß André