Mit dieser Anleitung zeig ich euch wie ich auf meinem System ein VPN Server mit eigenem DNS Server und Domain Filter angelegt habe.
Wer Traefik noch nicht installiert hat, findet hier eine Anleitung, wie ihr dies schnell tun könnt. Die Bestandteile dieser Anleitung sind:
- Wireguard: VPN-Server
- WG-Portal: VPN-Server GUI
- PiHole: DNS-Sinkhole (Blockieren von Trackern, Werbung … )
- Unbound: DNS-Server
Der Vorteil von WG-Portal besteht in der Möglichkeit von LDAP und dem Versenden von Mails.
Beides habe ich bisher noch nicht umgesetzt, soll aber zukünftig auf meinem System mit dem zentralen Autorisierungssystem Authentik und einem Mailsystem verbunden werden.
TODO:
- LDAP über Authentik
- Mailsystem
1. Ordner erstellen
Zuerst legen wir uns eine passende Ordner-Strukturen an:
mkdir -p /opt/containers/wireguard-portal2. Docker Compose anlegen
Nun legen wir die eigentliche Docker Datei an. Diese dient dazu unseren späteren Container zu erstellen.
nano /opt/containers/wireguard-portal/docker-compose.ymlInhalt:
version: "3"

networks:
  #Internes Netzwerk für die Kommunikation zu pihole und unbound
  wireguard-net:
    ipam:
      driver: default
      config:
        - subnet: 10.8.1.0/24
  proxy:
    external: true

services:
  unbound:
    image: "mvance/unbound:latest"
    container_name: unbound
    restart: unless-stopped
    hostname: "unbound"
    volumes:
      - "./unbound:/opt/unbound/etc/unbound/"
    networks:
      wireguard-net:
        ipv4_address: 10.8.1.2
  pihole:
    depends_on: [unbound]
    container_name: pihole
    image: pihole/pihole:latest
    restart: unless-stopped
    hostname: pihole
    dns:
      - 127.0.0.1
      - 10.8.1.2 # Points to unbound
    environment:
      TZ: "Europe/Berlin"
      WEBPASSWORD: "" # Blank Passwort für pihole
      ServerIP: 10.8.1.4 # Interne IP von pihole
      DNS1: 10.8.1.2 # Unbound IP
      DNS2: 10.8.1.2 # Unbound IP, wenn nicht 2 gesetzt sind, wird automatische google dns verwendet
    volumes:
      - "./etc-pihole/:/etc/pihole/"
      - "./etc-dnsmasq.d/:/etc/dnsmasq.d/"
    cap_add:
      - NET_ADMIN
    networks:
      wireguard-net:
        ipv4_address: 10.8.1.4

  wireguard-home:
    image: lscr.io/linuxserver/wireguard:latest
    container_name: wireguard-home
    cap_add:
      - NET_ADMIN
      - SYS_MODULE
    environment:
      - PUID=1000
      - PGID=1000
      - TZ=Europe/Berlin
      - PEERS=1
      - PEERDNS=10.8.1.4
      - ALLOWEDIPS=0.0.0.0/0
      - LOG_CONFS=true
      - SERVERURL=auto
      - INTERNAL_SUBNET=10.8.3.0
      - SERVERPORT=51922
    volumes:
      - ./wg_home/config:/config
      - /lib/modules:/lib/modules
    sysctls:
      - net.ipv4.conf.all.src_valid_mark=1
      - net.ipv4.ip_forward=1
    restart: unless-stopped
    networks:
      wireguard-net:
        ipv4_address: 10.8.1.15
      proxy:

    ports:
      - "51922:51820/udp"
    labels:
      - "traefik.enable=true"
      - "traefik.http.middlewares.wireguard-https-redirect.redirectscheme.scheme=https"
      - "traefik.http.routers.wireguard-home-secure.entrypoints=https"
      - "traefik.http.routers.wireguard-home-secure.rule=Host(`wireguard-home.euredomain.de`)"
      - "traefik.http.routers.wireguard-home-secure.service=wireguard-home"
      - "traefik.http.routers.wireguard-home-secure.tls=true"
      - "traefik.http.routers.wireguard-home-secure.tls.certresolver=http"
      - "traefik.http.routers.wireguard-home.entrypoints=http"
      - "traefik.http.routers.wireguard-home.middlewares=wireguard-https-redirect"
      - "traefik.http.routers.wireguard-home.rule=Host(`wireguard-home.euredomain.de`)"
      - "traefik.http.services.wireguard-home.loadbalancer.server.port=8123"
      - "traefik.docker.network=proxy"
  wg-portal-home:
    depends_on: [unbound, pihole, wireguard-home]
    image: h44z/wg-portal:latest
    container_name: wg-portal-home
    restart: unless-stopped
    cap_add:
      - NET_ADMIN
    network_mode: service:wireguard-home
    volumes:
      - ./wg_home/config:/etc/wireguard
      - ./wg_home/data:/app/data
    environment:
      # WireGuard Settings
      - WG_DEVICES=wg0
      - WG_DEFAULT_DEVICE=wg0
      - WG_CONFIG_PATH=/etc/wireguard
      # Core Settings
      - EXTERNAL_URL=https://wireguard-home.euredomain.de
      - WEBSITE_TITLE=WireGuard Home Valcube VPN
      - COMPANY_NAME=Valcube
      - ADMIN_USER=admin@domain.com
      - ADMIN_PASS=supersecret
      # Mail Settings
      #- MAIL_FROM=WireGuard VPN <noreply+wireguard@company.com>
      #- EMAIL_HOST=10.10.10.10
      #- EMAIL_PORT=25
      # LDAP Settings
      #- LDAP_ENABLED=true
      #- LDAP_URL=ldap://srv-ad01.company.local:389
      #- LDAP_BASEDN=DC=COMPANY,DC=LOCAL
      #- LDAP_USER=ldap_wireguard@company.local
      #- LDAP_PASSWORD=supersecretldappassword
      #- LDAP_ADMIN_GROUP=CN=WireGuardAdmins,OU=Users,DC=COMPANY,DC=LOCALCode-Sprache: PHP (php)
Notwendige Anpassungen:
- ADMIN_PASS ändern (WG-Portal Admin Password)
- WEBPASSWORD ändern (Pihole Admin Password)
- 3x eure Domain bei Traefik anpassen („wireguard-home.euredomain.de“)
Diese Docker Compose Datei funktioniert nur, wenn ich euch mittels der Anleitung hier Traefik installiert habt. Sonst heißen einige Traefik Variablen wohl anders. Diese müsst ihr dann dementsprechend bei euch anpassen.
3. Ordner für Unbound und PiHole anlegen
mkdir -p /opt/containers/wireguard-portal/{etc-dnsmasq.d,etc-pihole,unbound}3.1 Dateien für unbound anlegen
Damit der Container unbound startet müssen Dateien angelegt werden:
touch /opt/containers/wireguard-portal/unbound/a-records.conf
touch /opt/containers/wireguard-portal/unbound/srv-records.conf
touch /opt/containers/wireguard-portal/unbound/unbound.log
Die Dateien a-records.conf und srv-records.conf können bei Bedarf für Netzwerk interne Hostnames gepflegt werden
3.2 Configs für Unbound
3.2.1 unbound.conf
Nun legen wir die Konfigurationsdatei für Unbound an an.
nano /opt/containers/wireguard-portal/unbound/unbound.confInhalt:
server:
    ###########################################################################
    # BASIC SETTINGS
    ###########################################################################
    # Time to live maximum for RRsets and messages in the cache. If the maximum
    # kicks in, responses to clients still get decrementing TTLs based on the
    # original (larger) values. When the internal TTL expires, the cache item
    # has expired. Can be set lower to force the resolver to query for data
    # often, and not trust (very large) TTL values.
    cache-max-ttl: 86400

    # Time to live minimum for RRsets and messages in the cache. If the minimum
    # kicks in, the data is cached for longer than the domain owner intended,
    # and thus less queries are made to look up the data. Zero makes sure the
    # data in the cache is as the domain owner intended, higher values,
    # especially more than an hour or so, can lead to trouble as the data in
    # the cache does not match up with the actual data any more.
    cache-min-ttl: 300

    # Set the working directory for the program.
    directory: "/opt/unbound/etc/unbound"

    # RFC 6891. Number  of bytes size to advertise as the EDNS reassembly buffer
    # size. This is the value put into  datagrams over UDP towards peers.
    # The actual buffer size is determined by msg-buffer-size (both for TCP and
    # UDP). Do not set higher than that value.
    # Default  is  1232 which is the DNS Flag Day 2020 recommendation.
    # Setting to 512 bypasses even the most stringent path MTU problems, but
    # is seen as extreme, since the amount of TCP fallback generated is
    # excessive (probably also for this resolver, consider tuning the outgoing
    # tcp number).
    edns-buffer-size: 1232

    # Listen to for queries from clients and answer from this network interface
    # and port.
    interface: 0.0.0.0@53

    # Rotates RRSet order in response (the pseudo-random number is taken from
    # the query ID, for speed and thread safety).
    rrset-roundrobin: yes

    # Drop user  privileges after  binding the port.
    username: "_unbound"

    ###########################################################################
    # LOGGING
    ###########################################################################

    # Do not print log lines to inform about local zone actions
    log-local-actions: no

    # Do not print one line per query to the log
    log-queries: no

    # Do not print one line per reply to the log
    log-replies: no

    # Do not print log lines that say why queries return SERVFAIL to clients
    log-servfail: no
    # If you want to log to a file, use:
    # logfile: /opt/unbound/etc/unbound/unbound.log
    # Set log location (using /dev/null further limits logging)
    logfile: /dev/null

    # Only log errors
    verbosity: 0

    ###########################################################################
    # PRIVACY SETTINGS
    ###########################################################################

    # RFC 8198. Use the DNSSEC NSEC chain to synthesize NXDO-MAIN and other
    # denials, using information from previous NXDO-MAINs answers. In other
    # words, use cached NSEC records to generate negative answers within a
    # range and positive answers from wildcards. This increases performance,
    # decreases latency and resource utilization on both authoritative and
    # recursive servers, and increases privacy. Also, it may help increase
    # resilience to certain DoS attacks in some circumstances.
    aggressive-nsec: yes

    # Extra delay for timeouted UDP ports before they are closed, in msec.
    # This prevents very delayed answer packets from the upstream (recursive)
    # servers from bouncing against closed ports and setting off all sort of
    # close-port counters, with eg. 1500 msec. When timeouts happen you need
    # extra sockets, it checks the ID and remote IP of packets, and unwanted
    # packets are added to the unwanted packet counter.
    delay-close: 10000

    # Prevent the unbound server from forking into the background as a daemon
    do-daemonize: no

    # Add localhost to the do-not-query-address list.
    do-not-query-localhost: no

    # Number  of  bytes size of the aggressive negative cache.
    neg-cache-size: 4M

    # Send minimum amount of information to upstream servers to enhance
    # privacy (best privacy).
    qname-minimisation: yes

    ###########################################################################
    # SECURITY SETTINGS
    ###########################################################################
    # Only give access to recursion clients from LAN IPs
    access-control: 127.0.0.1/32 allow
    access-control: 192.168.0.0/16 allow
    access-control: 172.16.0.0/12 allow
    access-control: 10.0.0.0/8 allow
    access-control: 10.2.0.0/24 allow
    # access-control: fc00::/7 allow
    # access-control: ::1/128 allow

    # File with trust anchor for  one  zone, which is tracked with RFC5011
    # probes.
    auto-trust-anchor-file: "var/root.key"

    # Enable chroot (i.e, change apparent root directory for the current
    # running process and its children)
    chroot: "/opt/unbound/etc/unbound"

    # Deny queries of type ANY with an empty response.
    deny-any: yes

    # Harden against algorithm downgrade when multiple algorithms are
    # advertised in the DS record.
    harden-algo-downgrade: yes

    # RFC 8020. returns nxdomain to queries for a name below another name that
    # is already known to be nxdomain.
    harden-below-nxdomain: yes

    # Require DNSSEC data for trust-anchored zones, if such data is absent, the
    # zone becomes bogus. If turned off you run the risk of a downgrade attack
    # that disables security for a zone.
    harden-dnssec-stripped: yes

    # Only trust glue if it is within the servers authority.
    harden-glue: yes

    # Ignore very large queries.
    harden-large-queries: yes

    # Perform additional queries for infrastructure data to harden the referral
    # path. Validates the replies if trust anchors are configured and the zones
    # are signed. This enforces DNSSEC validation on nameserver NS sets and the
    # nameserver addresses that are encountered on the referral path to the
    # answer. Experimental option.
    harden-referral-path: no

    # Ignore very small EDNS buffer sizes from queries.
    harden-short-bufsize: yes

    # If enabled the HTTP header User-Agent is not set. Use with caution
    # as some webserver configurations may reject HTTP requests lacking
    # this header. If needed, it is better to explicitly set the
    # the http-user-agent.
    hide-http-user-agent: no

    # Refuse id.server and hostname.bind queries
    hide-identity: yes

    # Refuse version.server and version.bind queries
    hide-version: yes

    # Set the HTTP User-Agent header for outgoing HTTP requests. If
    # set to "", the default, then the package name and version are
    # used.
    http-user-agent: "DNS"

    # Report this identity rather than the hostname of the server.
    identity: "DNS"

    # These private network addresses are not allowed to be returned for public
    # internet names. Any  occurrence of such addresses are removed from DNS
    # answers. Additionally, the DNSSEC validator may mark the  answers  bogus.
    # This  protects  against DNS  Rebinding
    private-address: 10.0.0.0/8
    private-address: 172.16.0.0/12
    private-address: 192.168.0.0/16
    private-address: 169.254.0.0/16
    # private-address: fd00::/8
    # private-address: fe80::/10
    # private-address: ::ffff:0:0/96

    # Enable ratelimiting of queries (per second) sent to nameserver for
    # performing recursion. More queries are turned away with an error
    # (servfail). This stops recursive floods (e.g., random query names), but
    # not spoofed reflection floods. Cached responses are not rate limited by
    # this setting. Experimental option.
    ratelimit: 1000

    # Use this certificate bundle for authenticating connections made to
    # outside peers (e.g., auth-zone urls, DNS over TLS connections).
    tls-cert-bundle: /etc/ssl/certs/ca-certificates.crt

    # Set the total number of unwanted replies to eep track of in every thread.
    # When it reaches the threshold, a defensive action of clearing the rrset
    # and message caches is taken, hopefully flushing away any poison.
    # Unbound suggests a value of 10 million.
    unwanted-reply-threshold: 10000

    # Use 0x20-encoded random bits in the query to foil spoof attempts. This
    # perturbs the lowercase and uppercase of query names sent to authority
    # servers and checks if the reply still has the correct casing.
    # This feature is an experimental implementation of draft dns-0x20.
    # Experimental option.
    use-caps-for-id: yes

    # Help protect users that rely on this validator for authentication from
    # potentially bad data in the additional section. Instruct the validator to
    # remove data from the additional section of secure messages that are not
    # signed properly. Messages that are insecure, bogus, indeterminate or
    # unchecked are not affected.
    val-clean-additional: yes

    ###########################################################################
    # PERFORMANCE SETTINGS
    ###########################################################################
    # https://nlnetlabs.nl/documentation/unbound/howto-optimise/
    # https://nlnetlabs.nl/news/2019/Feb/05/unbound-1.9.0-released/

    # Number of slabs in the infrastructure cache. Slabs reduce lock contention
    # by threads. Must be set to a power of 2.
    infra-cache-slabs: 8

    # Number of incoming TCP buffers to allocate per thread. Default
    # is 10. If set to 0, or if do-tcp is "no", no  TCP  queries  from
    # clients  are  accepted. For larger installations increasing this
    # value is a good idea.
    incoming-num-tcp: 10

    # Number of slabs in the key cache. Slabs reduce lock contention by
    # threads. Must be set to a power of 2. Setting (close) to the number
    # of cpus is a reasonable guess.
    key-cache-slabs: 8

    # Number  of  bytes  size  of  the  message  cache.
    # Unbound recommendation is to Use roughly twice as much rrset cache memory
    # as you use msg cache memory.
    msg-cache-size: 2502214997

    # Number of slabs in the message cache. Slabs reduce lock contention by
    # threads. Must be set to a power of 2. Setting (close) to the number of
    # cpus is a reasonable guess.
    msg-cache-slabs: 8

    # The number of queries that every thread will service simultaneously. If
    # more queries arrive that need servicing, and no queries can be jostled
    # out (see jostle-timeout), then the queries are dropped.
    # This is best set at half the number of the outgoing-range.
    # This Unbound instance was compiled with libevent so it can efficiently
    # use more than 1024 file descriptors.
    num-queries-per-thread: 4096

    # The number of threads to create to serve clients.
    # This is set dynamically at run time to effectively use available CPUs
    # resources
    num-threads: 5

    # Number of ports to open. This number of file descriptors can be opened
    # per thread.
    # This Unbound instance was compiled with libevent so it can efficiently
    # use more than 1024 file descriptors.
    outgoing-range: 8192

    # Number of bytes size of the RRset cache.
    # Use roughly twice as much rrset cache memory as msg cache memory
    rrset-cache-size: 5004429994

    # Number of slabs in the RRset cache. Slabs reduce lock contention by
    # threads. Must be set to a power of 2.
    rrset-cache-slabs: 8

    # Do no insert authority/additional sections into response messages when
    # those sections are not required. This reduces response size
    # significantly, and may avoid TCP fallback for some responses. This may
    # cause a slight speedup.
    minimal-responses: yes

    # # Fetch the DNSKEYs earlier in the validation process, when a DS record
    # is encountered. This lowers the latency of requests at the expense of
    # little more CPU usage.
    prefetch: yes

    # Fetch the DNSKEYs earlier in the validation process, when a DS record is
    # more CPU usage.
    prefetch-key: yes

    # Have unbound attempt to serve old responses from cache with a TTL of 0 in
    # the response without waiting for the actual resolution to finish. The
    # actual resolution answer ends up in the cache later on.
    serve-expired: yes

    # Open dedicated listening sockets for incoming queries for each thread and
    # try to set the SO_REUSEPORT socket option on each socket. May distribute
    # incoming queries to threads more evenly.
    so-reuseport: yes

    ###########################################################################
    # LOCAL ZONE
    ###########################################################################

    # Include file for local-data and local-data-ptr
    include: /opt/unbound/etc/unbound/a-records.conf
    include: /opt/unbound/etc/unbound/srv-records.conf

    ###########################################################################
    # FORWARD ZONE
    ###########################################################################

    include: /opt/unbound/etc/unbound/forward-records.conf


remote-control:
    control-enable: no
3.2.2 Überschreibe forward-records.conf
Standardmäßig sind Weiterleitungen für die Verwendung von Cloudflare-DNS konfiguriert. Sie können Ihre eigene Konfigurationsdatei erstellen:
nano /opt/containers/wireguard-portal/unbound/forward-records.confFalls nicht gewünscht muss in der zuvor erstellten unbound.conf die Zeile
include: /opt/unbound/etc/unbound/forward-records.confCode-Sprache: JavaScript (javascript)auskommentiert werden.
Mögliche Konfiguration sind unter anderem hier abrufbar forward-records.conf
Ich habe mich für den security-filter-dns von cleanbrowsing entschieden und die Datei wie folgt gefüllt:
forward-zone:
    name: "."
    forward-addr: 185.228.168.9@853#security-filter-dns.cleanbrowsing.org
    forward-addr: 185.228.169.9@853#security-filter-dns.cleanbrowsing.org
    forward-addr: 2a0d:2a00:1::2@853#security-filter-dns.cleanbrowsing.org
    forward-addr: 2a0d:2a00:2::2@853#security-filter-dns.cleanbrowsing.org
    forward-tls-upstream: yesCode-Sprache: CSS (css)
4. Starten der Container
Nun können die Container gestartet werden:
docker compose -f /opt/containers/wireguard-portal/docker-compose.yml up -dÜberprüfen ob die Container starten, bzw laufen:
docker compose -f /opt/containers/wireguard-portal/docker-compose.yml logs -fbzw einzeln mit:
docker logs -f unbound
docker logs -f pihole
docker logs -f wireguard-home
docker logs -f wg-portal-home
5. Einrichten von WG-Portal
Leider funktioniert WG-Portal nicht direkt beim starten des Containers. Aus einem mir unbekannten Grund werden nicht alle Einstellungen aus den Umgebungsvariablen des docker compose in die wg0.conf von wireguard übertragen. Daher müssen wir über das WG-Portal die Einstellungen nochmal überarbeiten.
5.1 Einloggen in WG-Portal
Über die URL https://wireguard-home.euredomain.de/ sollte jetzt die WG-Portal Gui erreichbar sein.
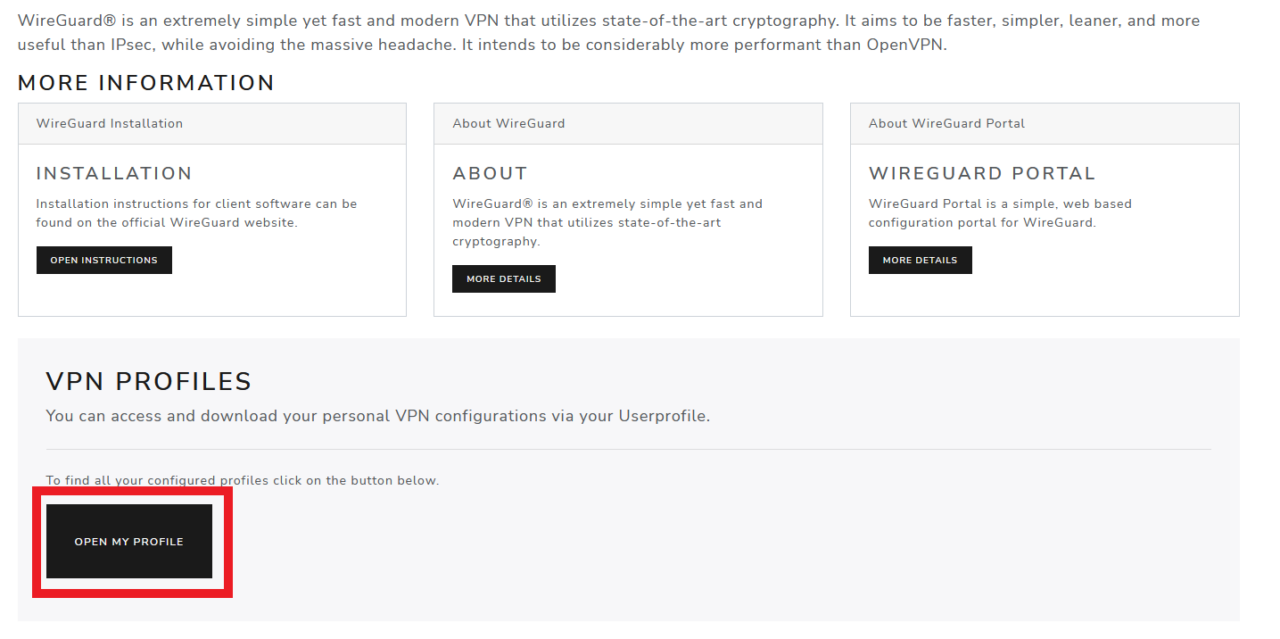
Hier nun mit den am Anfang definierten Benutzerdaten ADMIN_USER und ADMIN_PASS einloggen und dann in das Administrator Fenster Wechseln:
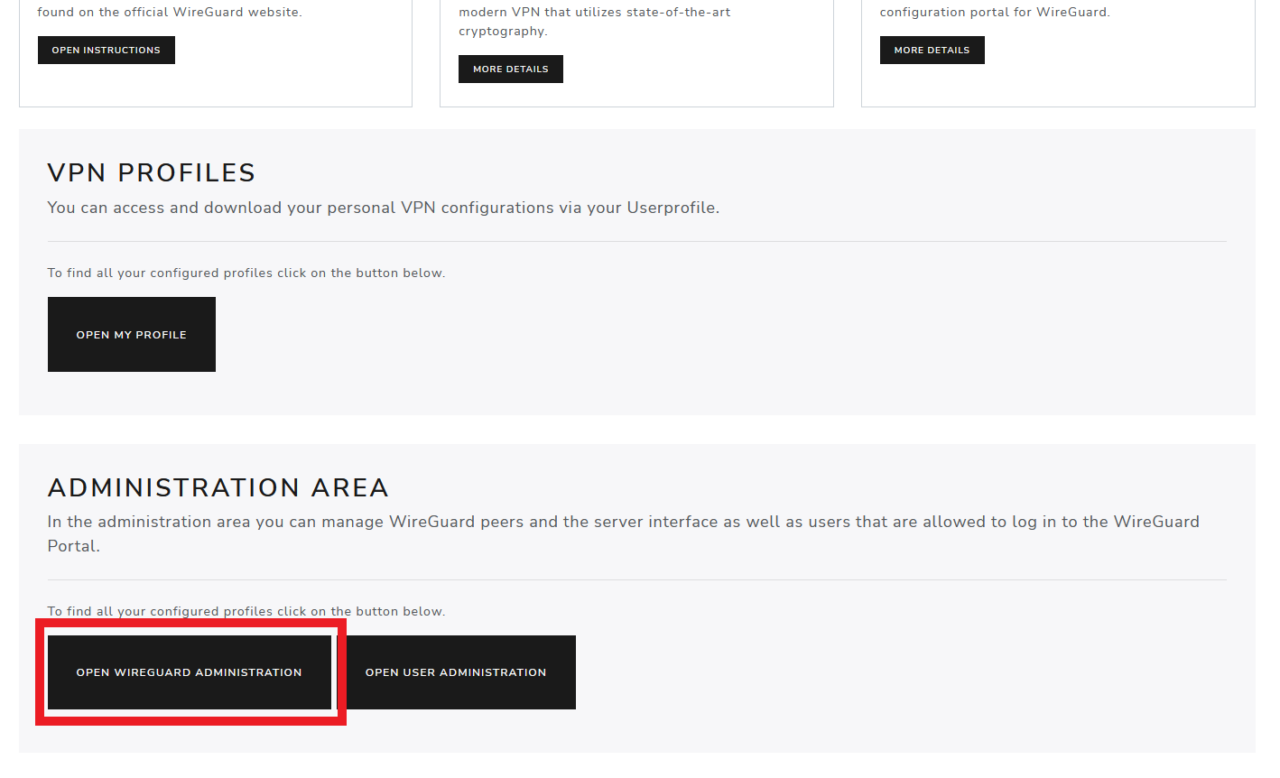
5.2 Konfigurieren der Servereinstellungen:
Der derzeit zu sehende rote Balken meldet eine fehlerhafte Konfiguration des wg0. Diese muss nun angepasst werden, dazu in die Einstellung des wg0 Interfaces wechseln:
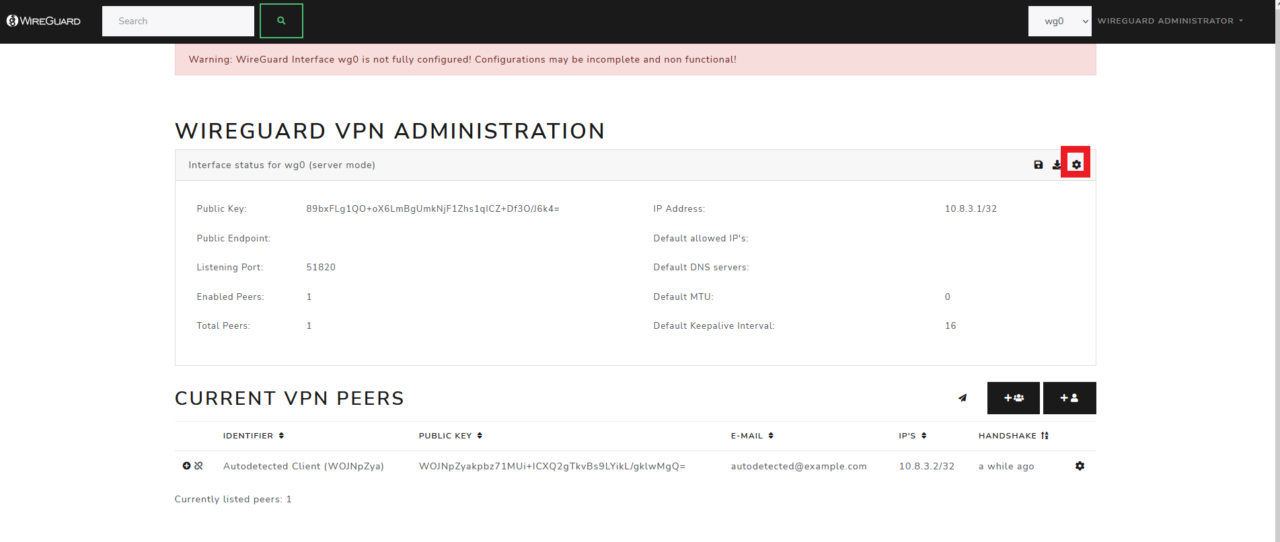
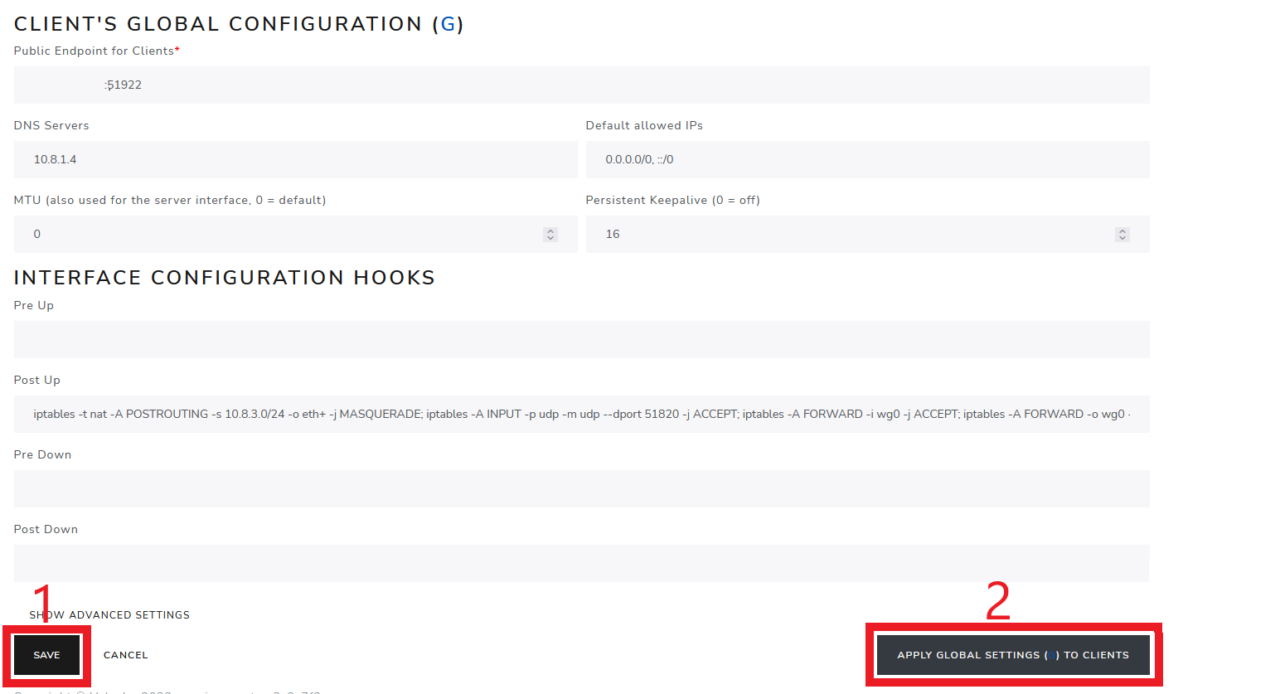
Hier müssen folgende Parameter gesetzt werden:
- Default allowed IPs :
0.0.0.0/0, ::/0 - Server IP address:
10.8.3.0/24 - DNS Servers :
10.8.1.4
interne pihole ip - Public Endpoint for Clients :
<server ip>:<externer port>
Externer port ist nach docker-compose Datei hier: 51922 - Post Up:
iptables -t nat -A POSTROUTING -s 10.8.3.0/24 -o eth+ -j MASQUERADE; iptables -A INPUT -p udp -m udp --dport 51820 -j ACCEPT; iptables -A FORWARD -i wg0 -j ACCEPT; iptables -A FORWARD -o wg0 -j ACCEPT;
Hab ich selbst noch nicht verstanden/nachgeschaut was dieser Befehl genau macht. Aber es funktioniert. Kann das wer erklären?
5.3 Testen der Verbindung
Im Administratormenü ist bereits ein Client als Autodetected Client aufgenommen werden. Dieser sollte nun auf die zuvor gemachten Einstellungen angepasst worden sein.
Dieser Clienteintrag lässt sich aufklappen und dann als QRCode oder Datei auf den Client übertragen werden.
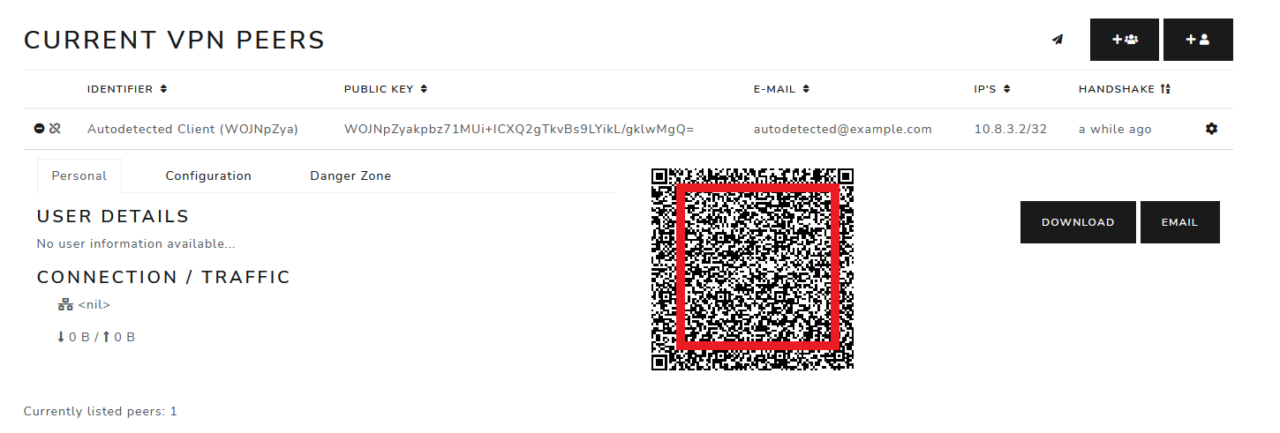
Sollte dieser Verbindung nicht funktionieren (Bei mir war der QR Code defekt), kann man ein neuen Client hinzufügen, dieser sollte dann funktionieren.
Zum Testen VPN-Verbindung aufbauen und beliebige Website öffnen.
Über die Adresse http://10.8.1.4/admin ist jetzt auch die GUI von PiHole erreichbar
5.4 AllowedIPs Konfiguration (Optional)
Wireguard bietet leider keine direkte Option einen gewissen IP Bereich nicht über das VPN zu tunneln, da man nur de Option AllowedIPs als Konfigurationsoption zur Verfügung hat. Um z.B. sein eigenes lokales Netzwerk weiterhin erreichen zu können und alles andere über das VPN zu tunneln, muss im AllowedIPs Eintrag der lokale Netzwerkbereich ausgeschlossen werden. Wer das nicht selbst berechnen will, dem könnte unter anderem diese OnlineTool helfen: https://krasovs.ky/2021/07/04/wireguard-allowed-ips.html . Hier lassen sich sowohl AllowedIPs als auch DisallowedIPs angeben und in eine resultierende AllowedIPs Liste konvertieren.
6. Quellen
Wirehole
WG-Portal
Unbound Docker

Hi,
leider scheint die Anleitung nicht mehr zu funktionieren. Es haben sich scheinbar mehrere Änderungen im wg-home-container ergeben, angefangen mit einem anderen Ort für die config.yml (hier kann man die Umgebungsvariable WG_PORTAL_CONFIG=/pfad/im_containerl/config.yaml setzen.)
Die config.yml muss dann aber selbst erstellt werden, das habe ich leider noch nicht ans laufen bekommen, vielleicht wird hieraus ja wer schlauer als ich: https://wgportal.org/latest/documentation/configuration/overview/
ueber ein Update wuerde ich mich also sehr freuen 🙂
Hi,
ich habe Traefik nach der neuen Anleitung (https://goneuland.de/traefik-v2-3-reverse-proxy-mit-crowdsec-im-stack-einrichten/) eingerichtet.
Die Container aus dieser Config laufen, so weit ich das sagen kann. Allerdings kann ich die Subdomain für Wireguard nicht öffnen, es kommt zu einem Bad-Gateway-Fehler.
Woran könnte das liegen?
Schönes Tutorial. Darf man Interesse halber fragen, warum das ganze so umständlich mit 4 Containern gelöst ist, statt denselben Funktionsumfang via weejewel/wg-easy und adguard/adguardhome zu erreichen? Insbesondere seit ich AGH nutze, weine ich PiHole keine Träne mehr hinterher. Neueste Standards via DoQ sind bereits integriert und das ganze ist auf GO-Basis wesentlich performanter.
Hallo und Danke für die Anleitung in der einmal die wichtigen Komponenten zusammenhängend aufgeführt sind. Ich hänge leider am Importieren des Tunnels aus einer Datei fest. Ich habe das bereits mehrfach probiert. Der Fehler ist “Importieren der Konfiguration nicht möglich: Ungültiger Schlüssel: illigal base 64 data at input byte 0: “<please-insert-your-private-keys>”. Der steht da in der conf Datei nämlich nicht drin.
Schonmal danke für einen Tipp.
Huhu sehr gutes Tutorial, herzlichen Dank dafür.
Wichtiger ist Herzlichen Dank für den Hinweis auf Authentik.
Ich stecke seit einer Zeit bei einem bestimmten Problem mit LDAP fest Authentik könnte meine Lösung sein.
Wenn du wegen dem Mailserver mit LDAP Schwierigkeiten haben solltest (hatte ich definitiv), schau doch mal hier https://goneuland.de/ldap-nextcloud-und-mailserver-in-docker/ vorbei. Evtl findest du etwas Inspiration.